 Chances are, you found this page wanting to learn How to Start a Blog. If so, you’ve come to the right place! 🙂
Here I will teach you exactly how to start your own blog, from the starting stages of domain and hosting to the finishing touch of posts and plugins in less than 30 minutes.
Whether you are an absolute beginner or a pro blogger, I want to help you achieve your blogging dreams and desires. I made sure that all instructions are simple to read, easy to follow, and quick to implement.
Step 1 – Before Getting Started – Choose Your Blogging Platform (WordPress), Domain and Web Hosting
There are many blog platforms out there for blogging, but there are only a few you should pay attention to – with only one that should be seriously considered: WordPress.
WordPress is the single biggest and best blogging platform in existence, and their service doesn’t cost a dime. Installing the system isn’t the simplest of tasks for someone new to website building (but don’t worry, I will explain it later on in this guide), but creating posts and using your blog couldn’t get any easier.
All the content you will write with your new blog is done with a tool that largely resembles Microsoft Word, so creating posts couldn’t get more simple. You will be able to create pages, publish posts, organize information by categories and tags and much, much more.
Visitors can leave comments on posts, participate in polls, donate through buttons and much more. If you like seeing the statistics of your blog, you can see the number of visitors you receive, where they came from to get to your site, what links they clicked on, what posts they liked and read the most and other sorts of data.
While some other systems offer similar features, WordPress dominates the blogging world and is something you can quickly and simply become accustomed to using.
Why should you use WordPress to build your blogs or websites?
 Open Source Application – Meaning it’s contributed to by website and website developers and co developers literally all around the world, who tweak the code day in day out in order to make WordPress a state of the art application. It’s a fantastic application that is not only free to use, but is so easy to use as well.
- Great Content Management System (CMS) – That means WordPress makes it very easy for you to write content and have it posted in a way that is not only chronology listed in date order but also into categories where you would like to keep it, also your work gets saved and people can research your site or blog and find your topics. Like you could be a dietician and have various topics on different diets, exercises, and other health related issues and so forth. Well, WordPress makes it very easy to sort out these topics and categories on your website.
- Easy to Rank in Google – It seem that Google just loves WordPress content as it is usually very content rich and keyword orientated. So who’s who in the blogging community is using the WordPress platform to make their blogs, and that’s just the way it is right now.
- Great Blogging Platform – The reason for that again is that WordPress seems to rank very well with Google and after all we all want to be on the front page of Google for whatever reason. Yes I can see some Geeks out there now rolling their eyes who know exactly why this is, but all I can tell you is that research tells us that WordPress blogs are the way to get noticed.
WordPress is a great system that just about anyone can use, because believe me it is a simple Content Management System (CMS) to use and a great way to get a presence and noticed on the Internet for whatever reason you would like to be noticed.
Why Do You Need Web Hosting & Domain Name For Your New WordPress Blog?
- Web Hosting Account – The very root of any website is the virtual real estate it sits on, called a hosting account. Much like the house you live in or the building you work in, the “location” of a website is the computer server it’s hosted on.We don’t need to get into the technical details of how this works, but think of your own computer. It has files, movies, pictures and documents, right? If you want your friend to access those files, you would “share” them, letting anybody on your internet network access them.This is exactly how a website works. A bunch of files, images, movies and documents sit on a computer, and that computer gives anyone on its network access. Unfortunately, we can’t do this with our own computers – we have to use servers. To start a blog with WordPress platform, we must “rent” a spot on a server so we can let everyone see our website – not just us!
- Domain Name – Once you own your little space on the internet, you need to call it something!All your future readers and fans will need to know how to find your blog, right? – They will do this by searching for your “domain name” – also known as your website’s URL. If you still aren’t sure what a domain name is, here are some examples: Google.com, eBay.com, Amazon.com and of course our domain BetterStartBlogging.com.You can choose any domain name you want, as long as it isn’t taken already. It is typically a good idea to choose your first and last name to be your website URL, since it is likely to be available.
For your blog to technically exist you must both have hosting and a domain name – One can’t exist without the other.
Where Should I Get My Domain Name And Web Hosting Account?
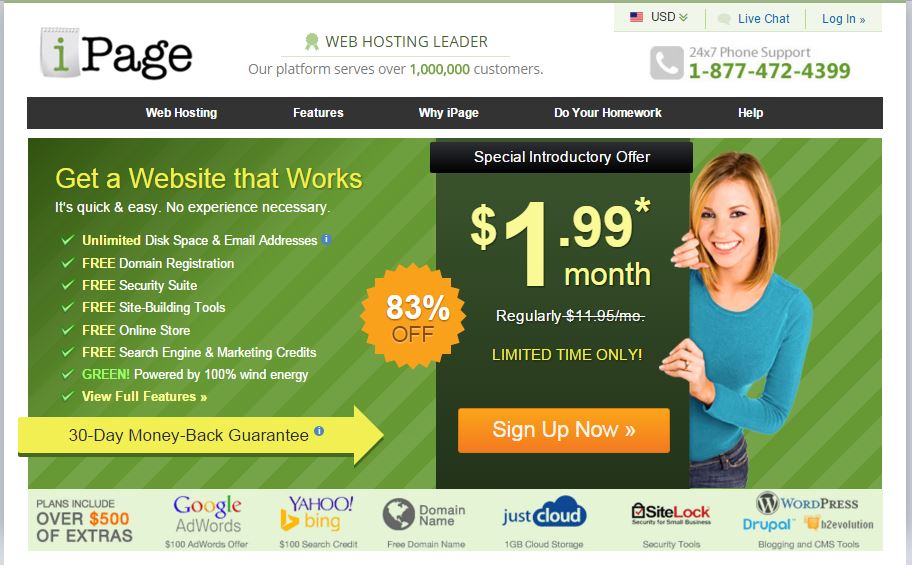
After hosting with many web hosting providers since 2000, I finally decided to trust iPage hosting. I have been hosted by some big name hosting providers like Bluehost, Godaddy, Hostgator, Fatcow and Justhost but they all fell short at critical moments.
![]() I chose iPage for several reasons:
I chose iPage for several reasons:
- iPage is a recommended WordPress web hosting company and serves over 1 million customers worldwide.
- iPage offers an affordable WordPress hosting account and a free domain name registration at $1.99/month (83% off for Better Start Blogging users).
- Over $500 in free marketing and tools coupons. For example, Google Adwords (100$ free coupon), Bing (100$ free coupon), Justcloud (Free 1GB Storage) and more.
- iPage offers a 30-day money-back guarantee
- vDeck control panel is installed on iPage servers and gives you greater flexibility for managing your iPage web hosting account.
- An excellent 24/7 support team with replies in under 30 minutes.
- iPage has a proven technical team and a forward-thinking mind-set.
- iPage uses new hardware and constantly upgrades old hardware.
- iPage is powered by 100% wind energy.
Trust me when I say I have had bad experiences with downtime, poor support services and impossibly low bandwidth. Some of these hosting providers are still praised by many hosting review sites.
The bottom line comes down to how much you value your blog, website or business. From experience, I rather pay a few more extra dollars every month to keep my site up and online without the hassle of down time. Ask yourself how much you value your readers or customers! If your answer is a lot, then quality web hosting like iPage is a must!
Step 2 – Set up a Blog on Your Own Domain Name (AKA, Self-Hosted WordPress Blog)
1. Go to www.iPage.com And Then Click “Sign Up Now”.
Keep in mind: Because I’m working with iPage on my blogs and websites too, I’ve managed to obtain a discounted rate for those who take advantage of this “How to Start a Blog” guide (83% off for a limited time only). This discounted price will be applied automatically. Have fun! 🙂
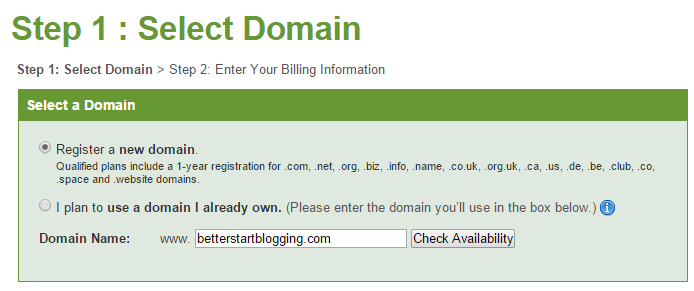
2. Select a Free Domain Name For Your Blog
Already have a domain name?
Simply type it in the suitable field (I plan to use a domain I already own) and continue to the next step by clicking “continue”.
Free Domain Name Registration
If you don’t have a domain name, you can register a new domain for free (.com, .net, .org, .biz, .info, .name, .co.uk, .org.uk, .ca, .us, .de, .be, .club, .co, .space and .website domains).
A good way to look at finding your domain name is to see the name as an asset or brand for your blog, website or business. Choosing the right domain name is essential to the success of your blog and online business.
How To Choose a Good Domain Name For Your Blog?
- Aim to find a domain name as close to your blogs name as possible. If your blog is about weight loss, fashion or food you will be looking to include weight loss, fashion or food keywords in your domain name. The last thing you want is to confuse your visitors.
- Another good idea is to choose your first and last name to be your domain name – since it is likely to be available!
- Make your domain name as short and catchy as you can. The more memorable it is the easier for your future visitors
- Ideally you will want to find a domain name that can easily be remembered through word of mouth from your readers. Remembering a domain name is very important from a marketability perspective.
- Look for a dot com name as dot com domains were the first to be registered and as such are the premium domain types.
3. Enter Your Billing Information And Complete Your Registration
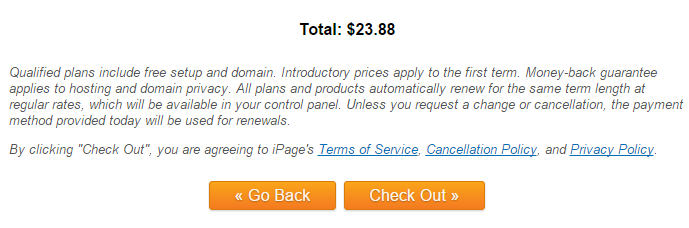
Complete your account contact and payment information (you can pay with credit card or PayPal account) and then scroll down to select your web hosting billing cycle. As you can see, the price is $1.99/month (83% off for Better Start Blogging users). And you can pay for one, two or three years.

Keep in mind, that you are required to pay the yearly charge in advance. That’s how iPage can afford to offer these extremely affordable prices. Here’s the mathematics:
- 12 months at $1.99 per month is $23.88 per year and $23.88 upfront.
- 24 months at $1.99 per month is $23.88 per year and $47.76 upfront.
- 36 months at $1.99 per month is $23.88 per year and $71.64 upfront.
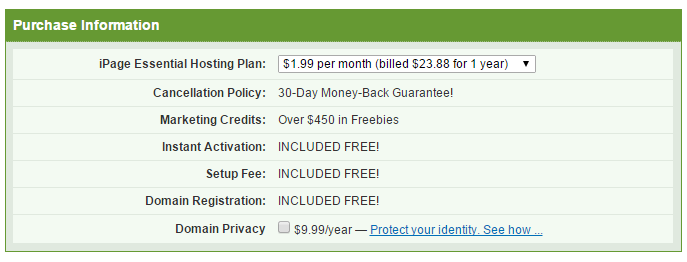
After choosing your billing cycle, you can choose if you want to protect your identity with domain privacy (this service costs $9.99/year).
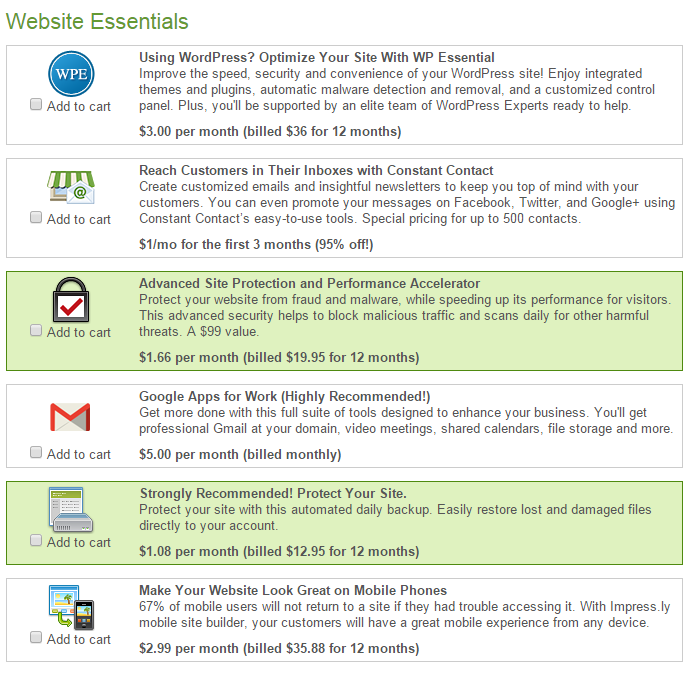
iPage will also offer you some “Website Essentials” tools. Usually, I don’t sign up for any of these additional “Website Essentials” services, but that depends on you.
Now click on the “Check Out »” button and the iPage billing system will verify your personal and credit card information. You should get a confirmation email once your web hosting account is set.
4. How to Install WordPress on iPage?
In the last step in my “How to Start a Blog” guide, we will look at WordPress installation on your iPage web hosting account.
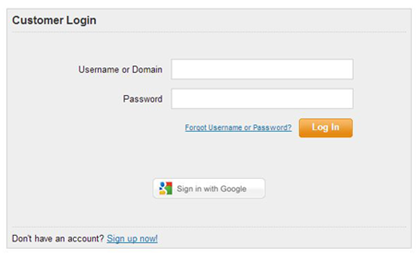
First you will need to login to your vDeck control panel. iPage should have supplied you with a link, username and password.
iPage enables you to install the WordPress script with only a few clicks. The process of installing WordPress on your server is straight forward to both beginners and advanced.
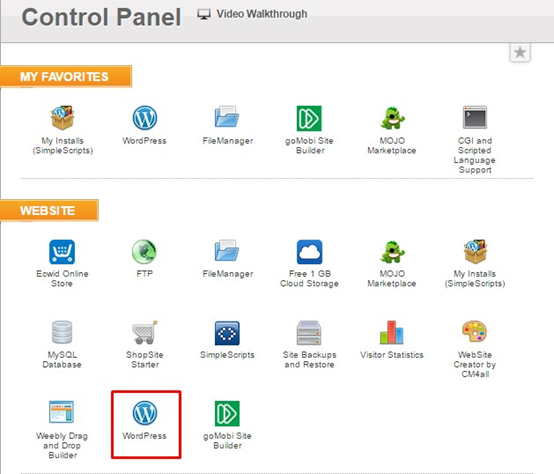
When logged in to your vDeck control panel, scroll down the page till you get to the “Website” header. You will then see a list of scripts installed and scripts available. You are looking for the WordPress icon. Click on it and follow the instructions.
On the following page, you’ll find important details about WordPress and some third party links. Scroll down until you come across the “Install” button and click on it.
On the following page, you will find out all the set up options for your new WordPress blog. First you need to choose the version of WordPress you would like to install (in case you are more comfortable with the previous versions).
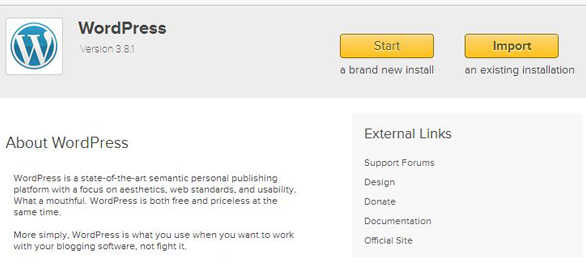
Then, type in the URL of the directory where WordPress data files is going to be installed on. This is the link you’ll use to open the WordPress page on your site. Under the Advanced Options section, insert a title for your WordPress blog along with the mandatory information for your own Admin account.
Next, choose the theme you wish to apply or get a premium theme (if you want, you can do it later). Finally, click the “I have read the terms and conditions” button and click on the “Complete” button. The whole WordPress installation process usually takes a couple of minutes. After WordPress installation ends, you’ll receive an email that shares your current login details, as well as an “Admin URL”.
In case you experience any kind of issues while you are installing WordPress on your iPage account, you can get in touch with iPage’s support. You are able to contact them at any time via phone, email or chat.
Congratulations –at this point, you learned how to create a new blog with WordPress. You’ve installed WordPress and created your first blog, by yourself! – As you can see, it was incredibly easy and simple as promised. 🙂
Step 3 – Configure, Design and Tweak your blog
To sign into your blog area, visit the admin Link you received. In case you forget this Link, it’s basically www.yourdomainname.com/wp-admin/ (when “yourdomainname” is your own domain name). 🙂
![]() http://www.yourdomainname.com/wp-admin/
http://www.yourdomainname.com/wp-admin/
Understanding the WordPress Dashboard
The WordPress Dashboard is the heart of the WordPress interface. Another way to think of the dashboard is a Content Management System (CMS). The goal of the WordPress dashboard is to put everything you need to design a blog or website right at your fingertips in a logical and easy to use format.
The standard installation setup will take you to Dashboard Home.
When you first log in you will see a screen like this:
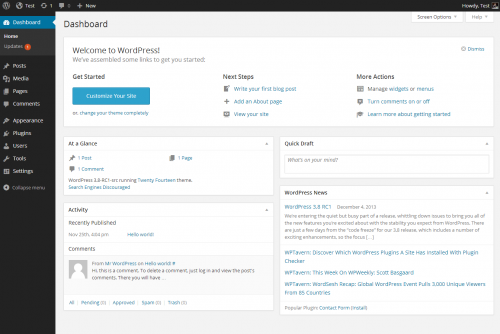
On the left you will find a navigation menu containing headings. Each of these headings has sub menus that allow you to interact with your site management, your pages or your posts. By using the menus and submenus you can customize and fine tune your WordPress blog or website.
A good way to get yourself familiar with the features and functions of each menu is to click on each and explore the options and settings that will open up. For example, if you click on Settings » General you can customize your time zone settings, blog title and subtitle, and even the URL of your home page.
WordPress Dashboard Menu
- Dashboard – Content Management Interface
- Pages – Static web pages that support your blog or website. Usually About Me, Contact Us and other types of information that you don’t want to be lost in the dog pile of your blog.
- Comments – Manage comments from your subscribers or visitors to your blog. Allows you to approve, edit, delete or mark comments as spam.
- Appearance – Blog or Site customization menu. Allows you to design the look and feel of your site using themes (templates).
- Plugins – Software gadgets that add features and functions to your WordPress site. Some examples of plugins include contact forms, SEO optimizers, spam blockers, video players, MP3 players and many more. WordPress has an extensive library of plugins that are free.
- Users – Manage your subscribers, admins, and other people authorized to deal with your site with varied levels of access.
- Tools – Allows you to import other blog formats such as Blogger and LiveJournal. You can also export WordPress to another WP site.
- Settings – Manage your WordPress site preferences. Set your time zone, email address and other preferences.
When you install Plugins and other gadgets, some of them will install a separate Menu item on the Dashboard navigation panel. Other plugins will be installed as a sub menu item depending on what the author determines as a logical place on the menu for that plugin.
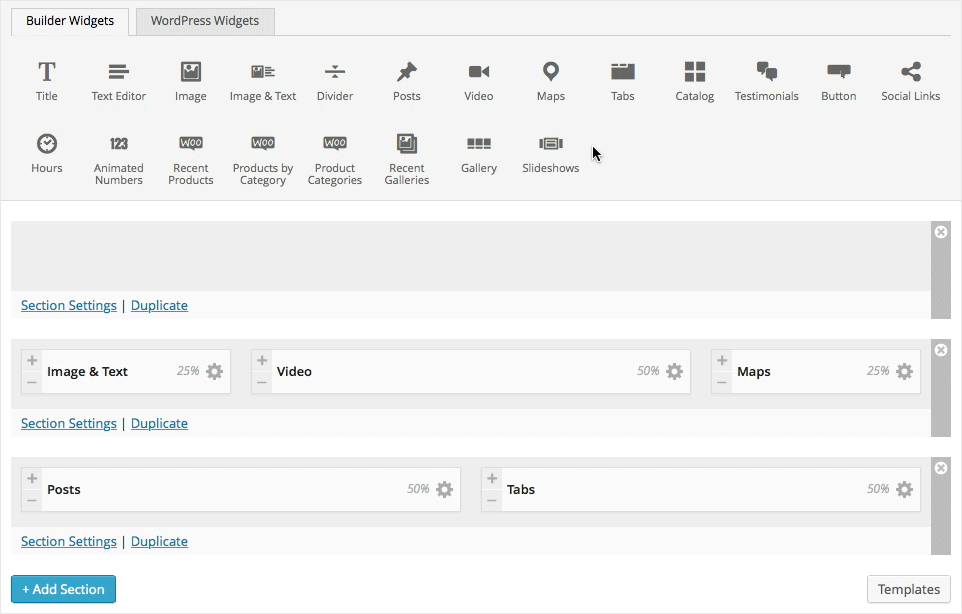
Changing Your Blog’s Design (Themes & Layouts)
A clean coded and attractive design that is easy to navigate should be the primary focus of anyone starting a blog. Many bloggers will use one of the thousands of free WordPress themes available from WordPress.
However if you really care about your blog you will opt for a premium WordPress theme.
The Advantages of Buying a Premium WordPress Theme
There are many reasons for choosing a premium WordPress theme over a free WordPress theme:
Ease of Customization
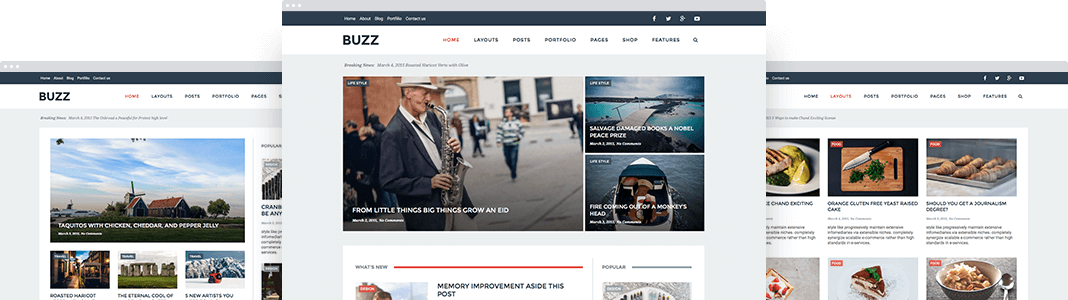
Premium WordPress Themes come with site options and design options control panel. What this means is you can customize the theme colors, add boxes to include sign up forms and upload your header or logo seamlessly. Many premium themes will automatically crop your header to optimize the visual display. Most important, you can change the font sizes and link colors. Some premium themes even include a custom file editor where you can add CSS code for more personal styling site wide or specific regions. In Better Start Blogging I am using the Buzz Theme by Pojo and I have options to customize just about everything.
Premium WordPress themes are kept updated and designed by professionals with HTML, PHP and CSS coding experience. The mark of a great premium theme is that the developers give a forum for help or offer documentation for customizing the theme. From experience, I would suggest to look for a theme with an active forum. You should check out their forum and see if there are many replies to users’ questions. It is poor help if no answers are being given to users. For example, Thesis Theme forum is monitored closely and I get answers within 30 minutes. In addition to the superb customer support, there are specialists available with PHP and CSS experience
Premium Themes Are Always Updated
WordPress is the best blogging platform, no questions. The WordPress developers do a great job updating and correcting any problems with security updates and framework updates. Buying a premium theme guarantees your theme will also get updates compatible with the latest WordPress updates. The same cannot be said for the majority of free WordPress themes.
Having a premium WordPress theme ensures you are getting the updates to any bugs or fixes in the theme. It is no fun if WordPress updates the core and your theme breaks apart.
Premium Themes Come With Premium Design and Style
Many premium WordPress themes offer a clean design with some of the best coding on the net. If you plan to promote a service or a product you will become aware that presentation is important. A premium theme oozes style with easy features to turn on or off. For example, if your aim is to build a mailing list you might wish to place opt-in forms in your blog header, or for promoting a service you might need to layout pricing plans in an attractive layout. A premium WordPress theme has these options built-in or they can be added with minor code changes. Again, a good theme forum will have all the support you need.
Some people refuse to pay for a premium theme. The real question you need to ask yourself is: am I serious about the success of my blog, website or business? If your answer is yes, then spending the price of a meal for two is not a lot to ask. Premium WordPress themes can be purchased for $50-$100 and most important, the price includes lifetime updates and support.
Premium WordPress Themes Improve Security
With the ever-changing net and possibility of being hacked, it is wise to add some form of WordPress security. Some premium themes have ongoing security audits, unlike free WordPress themes which are often built by amateurs and full of security holes in their coding. Premium themes are written by experts and lower the risk of hackers getting through. Believe me – it is no fun visiting your blog the day after a hacking, finding out that many of your links are now pointing to a gambling site.
Adding Child Themes
A great feature of Premium WordPress Themes is Child Themes. Child themes run on the basic theme but add extra code to customize the looks of the theme. Many premium themes offer built-in child themes. It is simply a matter of uploading the child theme to a folder in the main theme. Many bloggers choose the child theme road which easily allows you to completely change the look and feel of your site.
I can honestly say that buying a premium WordPress theme is the best thing you can do for your blog, website or business. The benefits outweigh the costs and will almost certainly boost your page rank.
You can find more information about WordPress themes in our Better Start Blogging blog:
- How Color Theory Psychology Can Boost Your Sales?
- Where To Get Cheap Royalty Free Photos For Your Niche Blogs?
Must Have Essential WordPress Plugins
 Essential WordPress plugins can extend the functionality of your WordPress blog. WordPress plugins come in two flavors – premium or free plugins. There are now more than 40,000 free WordPress plugins to choose from and you will find free plugins in many categories like Social, Security, Caching and more. WordPress plugins are starred so you can immediately see their popularity and amount of downloads.
Over the years, I have downloaded and installed many plugins – to try them out. Some were great to enable extra features. Others were not so good and I had to uninstall them. You may find after installing, a WordPress plug-in that affects your blog badly. Simply uninstall it and try another plug-in.
When starting a blog you are immediately faced with thousands of free WordPress plugins to choose from. Here is my list of WP plugins that I use consistently on my blogs. I put them in categories for ease of use and what I consider to be essential WordPress plugins.
General WordPress Plugins
- Google XML Sitemaps – Having a sitemap is a must for your blog. A sitemap informs search engines when you post or make changes to your blog. There is no limit to the size of your sitemap. The Google XML Sitemaps plug-in also supports Google news sitemap.
Essential Social Plugins
- Jetpack for WordPress – Jetpack for WordPress is a good choice if you are new to WordPrerss. The plug-in includes many modules for publicizing your posts in leading social bookmark sites, including Facebook, Twitter and Google+, inserting a contact form and adding social share buttons to your site. Jetpack also includes a handy Google authorship profile module.Jetpack can be heavy on your host bandwidth. In that case disable the modules you do not wish to use by clicking on the “learn more” under each module and then click “disable”.
- NextScripts: Social Networks Auto-Poster – NextScripts Auto Poster comes in two flavors: free and pro. The free version will suite many blog owners. NextScripts pro adds some important features like auto posting to Google+ and Pinterest. The pro version of NextScripts also allows multi site and posting to multiple accounts as in Facebook. You will be able to automatically publish posts from your blog to the most popular social network accounts such as Facebook, Twitter, Google+ (Google Plus), Blogger, Tumblr, LiveJournal, DreamWidth, Delicious, Diigo, Instapaper, Stumbleupon, LinkedIn, Pinterest, Plurk, VKontakte (VK.com) and more.I myself use the NextScripts pro version as I have many Facebook and Twitter pages. The plug-in is straightforward to set up and includes an excellent guide to configuring the social networks. You post as normal and NextScripts does all the rest and publishes to your favorite social networking sites.
- CommentLuv – CommentLuv plug-in is great for getting readers to comment on your site. It includes G.A.S.P anti spam and allows commentators to leave their Twitter name and link. Readers will get a follow link to their website or blog and you can search CommentLuv enabled blogs. The anti spam feature is far more effective than Akismet, so if you suffer from heaps of spam comments every time you visit your dashboard then install CommentLuv for WordPress. The pro version of CommentLuv allows you to choose the link when you leave a comment on another blog. Also, CommentLuv plug-in is good for content promotion.
WordPress User Roles and Managing Your User Information
WordPress creates several levels of access that allow people to interact with your new blog or website. If you are the blog owner you have the ability to add new users and manage existing users. You give people permission to access your site, modify your site, and leave posts or comments on your site. Each user is assigned a “role”. The user’s role determines what they can do while accessing your site.
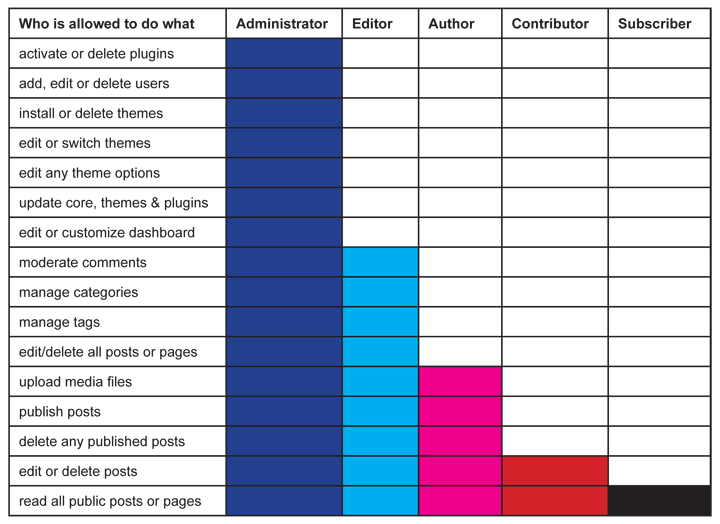
The roles that WordPress has for users are: Super Administrator, Administrator, Editor, Author, Contributor and Subscriber. If you create a blog – your subscribers would have a user role of follower.
- Super Administrator – WordPress has the ability to create multiple sites that are run from a single installation of WordPress. WP calls them a network of sites. A good example of a multi-site is wordpress.com. They will let you create a non-commercial blog and host it. If you want to name it myblog it would be myblog.wordpress.com. A super administrator user role allows a person to manage all the sub sites of the primary site. They can delete, add, update and create new blogs, sites, pages, etc. They can also assign other user roles.
- Administrator – This user role is usually the owner of a blog or site. This person has the ability to delete, create, update, edit and control a single site. He can also assign other user roles for a single site.
- Editor – An editor works like something of a moderator on a forum. He can edit, delete, and update other user posts. For example, you could assign an Editor to review and approve other users’ posts before they could be published.
- Author – The author user role gives an individual permission to create, edit, update, and delete his own posts.
- Contributor – A contributor can create, edit, and manage his own posts but cannot publish them. An administrator or an Editor would have to approve the post and then publish it.
- Subscriber – This role is useful if you want people to register to your site and then allow them to manage a profile. They would be able to create a profile, change passwords, and update their user information such as email address. They cannot create posts or pages on your site. Depending on your preferences you can allow subscribers to comment on posts or pages. You can choose to approve these comments or allow them to be automatically approved by subscribers.
- Follower – All blogs need followers. These are subscribers to your blog that give you their email address, so they can be notified when you post something new to your blog. You will only see this user role if you have a blog and allow people to follow you. You won’t see this role as an option for WordPress user roles in your dashboard. They cannot edit, add, or manage content on your blog.
- Viewer – This user role works like something of a subscriber or a follower in the dashboard for WordPress.com. If you have a private blog, this feature allows you to invite others to view it. They cannot edit, create, or manage content on your private blog.
Think of each WordPress user role as a person who is assigned different abilities. The higher level of permission you have the more abilities to interact with the blog, website or websites you get. You can have multiple users assigned the same roles. However, it’s best not to have more than one or two administrators.
Step 4 – Adding/Writing Blog Posts and Pages
The next-to-last building block on how to start a blog is the content you will create. Once you own your hosting and domain and have WordPress installed on your blog or website, it is time to fill it with posts and pages.
Whether you are blogging for money or just for fun, meaningful and relevant content is always appreciated by your blog’s visitors. Write something interesting and unique, be a little crazy or fun and maybe just be extremely informative and wise. Let your personality shine through your writing and portray your message to your readers, either to have them buy your products or support your cause.
Thankfully, writing content is a breeze with WordPress, so there won’t be anything technically difficult about writing content. Each day (or how often you want), type your post, fill it with images or movies, and hit the publish button. It couldn’t be any easier!
Step 5 – Making Money with Your Blog
The Internet comes not just with better communication and information sharing, but also with a great potential to earn money online. Thank heavens for the World Wide Web. Without it, I would not have found out about a venture with this much potential for high returns. And for someone who wishes to earn a lot, that sounds really, really appealing.
What is Affiliate Marketing and How Does it Work?
When I decided to establish an online business venture, a friend recommended affiliate marketing. If this is a new term for you, I suggest that you spend time studying the concept, although it is fairly easy to understand.
Affiliate marketing is basically earning money online by the promotion of another person’s (merchant) products or services. Then you earn through a commission percentage based solely on the translations you make (e.g. registrations, downloads, clicks, etc.). If you want to be part of this, you will then be called an “affiliate.”
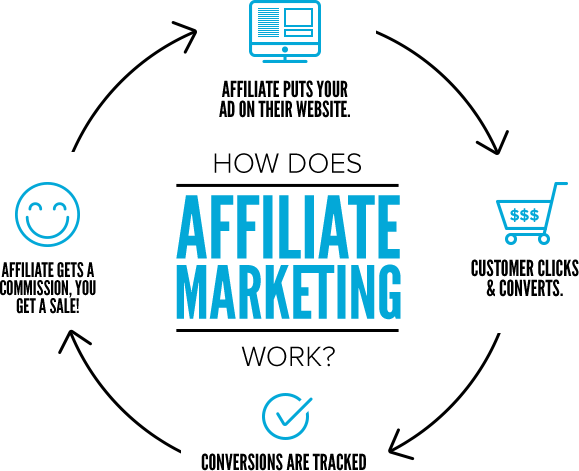
Affiliates or publishers usually promote their chosen merchant’s products or services through their websites, social media accounts and blogs. To earn through this online venture, you can opt for any of these three methods:
- Pay-per-lead – the affiliates earn from every visitor that enters information or signs up to the affiliate link.
- Pay-per-click (PPC) – the affiliates earn from each visitor’s click on the merchant’s link or banner.
- Pay-per-sale – the affiliates earn from every product or service a visitor buys through their website.
When I was choosing a merchant, I picked a company that was relevant to my niche market. In doing so, I had higher translations as my followers could relate to the product I was promoting. I suggest you do the same. Also, make sure that the merchant has a good reputation in the market.
What Affiliate Marketing has in Store for You?
The appeal of affiliate marketing is becoming more apparent, as plenty of bloggers and website owners are now venturing into it. What exactly can this strategy offer you?
- Internet-based business venture – You don’t have to go out of the house, you don’t even need to spend hours going door-to-door. You just need your computer and an Internet connection.
- High returns – According to reports from 2006, affiliates worldwide earned more than $6.5 billion in sales. Affiliates can earn as much as $20/week or over a million dollars in a year.
- You get paid for what you do – The pay-for performance characteristic of affiliate marketing ensures that you will earn commissions from registrations, sales, or clicks.
5 Reasons to Become an Affiliate
So why did I become an affiliate? After asking around and doing my own research, here are the reasons that finally made me decide to engage in this kind of venture:
- You Have Choices – The good thing about affiliate marketing is that you have a lot of choices. You can join a lot of affiliate programs that suit your preferences and you can promote more than one product or service. Moreover, affiliates can put up different blogs and websites for promoting different merchants.
- Less Risk, High Returns – Affiliate programs are free. You can start on this venture with very minimal capital, as you only need to pay for hosting and the domain name. As an affiliate, you don’t need to invest on developing the product or the service, which would take thousands of dollars. You only need to find a way to effectively promote it. And as stated above, the returns can potentially result in a million every year.

- You Don’t Need to be a Pro to Succeed – Unlike with applying for office jobs, merchants don’t require a sterling resume or an IT genius before accepting affiliates. This is open to anyone who wishes to earn money online.
- No Hassle of Delivery – You also don’t need to worry about the products delivery. This is between the buyer and the merchant.
- You’re the Boss – This is my favorite! The good thing about working online is that you work in your own time. You choose the amount of effort you put and decide how much you want to earn in a month. When you handle your own time, instead of working on a fixed schedule, you can devote it to other tasks like spending time with family and friends. Moreover, this has the potential to generate passive income, effectively giving you more free time on your hands.
How to Become an Affiliate?
Affiliate marketing seems fairly easy, doesn’t it?
Here is a step-by-step guide to become one:
- Choose your affiliate program – You cannot simply choose a merchant through fishbowl method. This process requires careful selection, which includes the following two steps:
- Research – Whether you’ve decided to stay within your niche market or to promote anything under the sun, you need to do some research on which products or services have a high conversion rate. Check out the seller’s website. Generally, a five percent conversion rate is already good.
- Join an affiliate program – Once you have settled a particular merchant, you can now choose an affiliate program. Most online companies offer free signups, while others require a certain fee. It is advisable to sign up for a program with recurring commissions that will continue to add up with every referral.
- Promote the product or service – Once you have signed up for an affiliate program, you can proceed on getting your affiliate links. Affiliate links will help you track the translations that you have. Afterwards, you can:
- Promote them on your website – If you don’t already have one, create a blog or a website where you will promote your affiliate link (Just follow the 5 steps above).
- Write relevant content – If the merchant sells a particular product (e.g. e-book), it would be good to write an article that’s relevant to the affiliate link. In doing so, it would also be easier for you to recommend the product/service to your readers.
- Generate more traffic to your blog or website – Of course, you need to actually have followers, in order to sell whatever it is that you are promoting. You can do this with:
- Article marketing – submit your articles to article directories. Don’t forget to include a link to your own blog.
- Commenting on forums – Make sure to post messages that are relevant and not spam. Otherwise, the webmaster will ban you. On your profile signature, again, include a link to your blog.
- Learn SEO – Search engine optimization is one of the most effective ways of generating traffic to your blog. You can either hire a specialist or learn the tricks of the trade yourself.
Although affiliate marketing has the potential to give you a million dollars per year, this is definitely not an overnight success. Contrary to popular belief, you don’t just sit around and expect the money to come in. You also have to do your part to attract more visitors to your website.
With perseverance, I believe the sky is the limit…:)


